Legendary Lair: Monument of Tiamat

The Monument of Tiamat is a breathtaking interpretation of the dragon queen's divine center of power, from its gigantic skull entrance through the sprawling cult and temple complexes to its volcanic throne room, where the players can face the five-headed goddess herself.
Honestly: This is a scope that many others would simply have offered as a Kickstarter add-on. The amount of content we are able to produce thanks to the support of our Patreon is enormous, so thank you!


Each map also lends to modular use, like a fortified dwarven tunnel-road, any great dragon’s lair or a hub or trading post that came together in the ruins of a forgotten structure. The release is not a collection of maps that have to be played completely and in a linear order. Some maps are closely connected, others can easily be used on their own.
ALL IN ALL:
-
10x Animated battlemaps + 10x animated sceneries
-
6x Immersive, custom ambient audio tracks tailored to the landscape
-
2x animated intro sequence
-
45+ 3D-rendered player handouts
Let's take a detailed look at each map and talk about what makes each of them a great fit for your adventures.
Map 1: Skull Entry

Fittingly, the entry is through a gigantic dragon skull. The tents create a lived-in atmosphere, it's a living, breathing place of worship. Per the module, it houses one of Tiamat’s greatest champions and of course we gave him, his bodyguard and his mount a Beneos makeover.

This starting point invites different approaches: the pilgrim's path, herded along with columns of cultists and supplicants, or full force straight ahead, fighting through hordes of devotees, dragonfiends, and draconic elites.
Map 2: Tunnel Highway

This tunnel section resembles a grand processional road with enough room for hordes of devotees, marching armies, or even whole dragons who have come to pay respect to their god-queen. The sheer scale is part of the storytelling. The huge architecture should show the players how small and vulnerable they are compared to a deity and her domain.
Map 3: Tunnel Exit

Along the way, you move beneath the gaze of two gigantic dragon statues. Draconic envoys could control access here, letting pass only the most devout.The statues themselves could speak with the voice of the goddess, or the players witnessed uncomfortable sacrifices. During combat, the statues could periodically flood the battlefield with different elemental effects.

Map 4: Monument Hub

Finally, you reach the Monument Hub, where wagons, tents, and market stalls once again breathe life into the place. Warlords wait here to be anointed by high priests before they stand before their mistress, relics get haggled over, or a thousand other NPC interactions play out. Draconic elites or dragonfiends can keep watch from the spires like gargoyles, while the bubbling lava from below gives a glimpse of the volcanic nature of the inner sanctum.

Map 5: Temple

Another processional path, but wilder and rawer. A large part of the original stone floor has been melted by dragonfire, hardened into black slag. This effect gives the otherwise majestic temple a wild, monstrous, draconic look. From here on, things get serious.

Map 6: Stairs
The spiral staircase winds either upward or downward into another hall. This staircase is not directly mentioned in the Avernus module, but the lore behind Tiamat is that her Monument has paths to other planes, which you can reach via the highways or a tower, depending on the source. So you can use the stairs and tunnels to resemble this.

Map 7: Sanctum Entry
The gothic stonework slowly gives way to the raw core of the volcano.

Black marble balconies over rivers of lava. Elite guards can easily hold the narrow passage against superior numbers.

Map 8: Sanctum Passage

Another monumental structure rising out of the lava. In the background, the passage into the central sanctum, the lair of the Tyrant-Queen, is already visible.

Map 9: Inner Sanctum
Tiamat is not simply locked inside an artificially built temple complex. If she wants to leave, she does not have to move through the corridors and staircases of her mortal followers. Instead, she could rise through the open volcanic shaft on her enormous wings and reach the surface from there. She has an enormous amount of freedom of movement within her domain. As a divine being, she may not even depend on ordinary physical movement.

The players are no longer approaching a temple or a simple lair, but the immediate dwelling place of a deity.

Map 10: Lair
Map 10 is the climax of the entire release. This is where the players can actually meet Tiamat herself.

This is a worthy stage for one of the most impressive moments a D&D campaign can have. The animation, Tiamat's size, and her immediate presence are meant to work even without a fight.

If you check out the video, you see that the players seem almost insignificant in the face of the dragon queen. The dimensions exceed anything the players usually experience with creatures.
You dont have to fight her - even though you can, as there is a worthy interpretation of her combat prowess released alongside this map pack - to make use of the scenery. have the players witness her judging a great dragon fallen from grace, one of the most powerful creatures in the setting, a mere speck of dust against her looming form. Have the players participate in this trial for the fallen courtier’s soul, pitting them against the dragon, earning the tyrant-queen’s favour if they slay the disgraced dragon under her five-fold gaze.

As always, we aim to release our content in whatever way is most useful for you, which is why here too we're once again taking the approach of a massive accompanying release of Beneos creatures, spells, and loot.
Along with the maps, Beneos Creatures, Spells & Loot relases the following creatures:
-
Tyrant-Queen of Dragons
-
Death's Head of the Tyrant Queen
-
Dragonfiend

-
Draconic Envoy
-
Adept of Dragonlore
-
Manticore
-
Minotaur Champion

If you're enjoying our maps, we invite you to consider supporting us here on Patreon. Your support helps us create more content to captivate your players and enrich your gaming experience. All our work is funded by our incredible community. As a token of our gratitude, we're proud to offer all our 2D battle maps for free! This is our way of saying 'Thank You' for your support and contribution.

Gone are days of navigating Google Drive or Moulinette. If you are using Foundry VTT, you can import the Foundry Tier content straight through our updated module. If you want to download the files, you can do so from our website, beneos-battlemaps.com.
Create a Beneos Cloud Account using the same email adress for your Patreon Account and you will be automatically verified within minutes and can download your zip files from our cloud.
Beneos Streaming is coming
This applies only to Foundry VTT users.
If you haven't, check out this post about how your life continues to become easier because you are supporting Beneos.
Streaming is a new way to use your content for VTTs. Beneos Shop costumers or active patrons have unrestricted access, no limits or throttling.
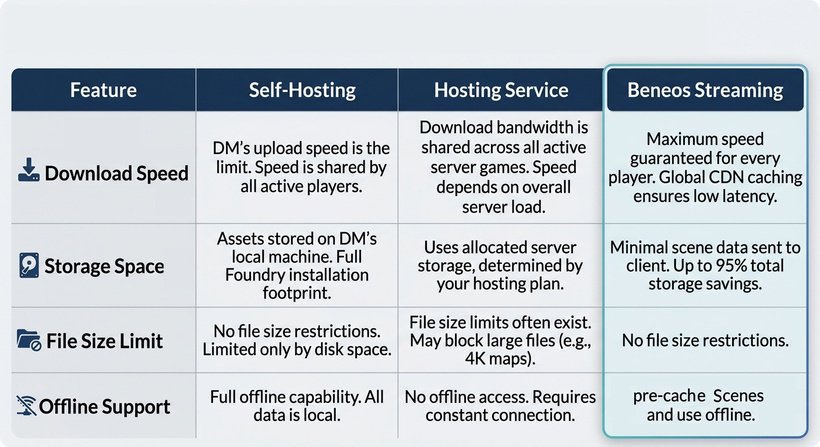
Because content is streamed instead of uploaded, we can bring Beneos maps to other browser based virtual tabletops. A Roll20 integration is in the works, and it does not touch your Roll20 storage quota at all. The same goes for Owlbear Rodeo and AboveVTT. We'll share more when we have more to show.
Check out the aforementioned post for more details!

A lot of changes have been made to the cloud, to the module, to the whole Beneos ecosystem. There is a whole different post detailing all the changes we have made, that you can (any probably should, because its super cool) check out here!
There's also a detailed FAQ that will bring you up to speed!
Disclaimer: Although I work super hard on my standard of quality, this is no official content! This map pack is unofficial Fan Content permitted under the Fan Content Policy. Not approved/endorsed by Wizards. Portions of the materials used are property of Wizards of the Coast. ©Wizards of the Coast LLC.